Tag Archives: french

Lovely Roasted Potatoes

I love, love, love roasted vegetables from a pan.

And my husband is such a good sport.  I know he loves them, too.  Without fail, when there’s extras on the pan after we’ve all eaten some, I ask, “Would you like some?” He always replies, “I know how you love them, so you can eat them.” Y’all, that’s L-O-V-E.

In fact, the very first recipe I ever wrote was roasted carrots here.  And I wrote it out because I made it regularly, served to people, and they all said… UMMM HOW DID YOU DO THIS MARVELOUSNESS? (I know, not a word.)  So the truth is that the concept, overall, works for all root vegetables.

Lovely Roasted Potatoes - Foodies Gone Real

Come winter… we eat roasted carrots and THESE roasted potatoes at least once a week. Sometimes more often. Reasons are as follows, in order of importance:

  1. They’re freakin’ awesome
  2. They are SO EASY
  3. They are so cheap
  4. You can multitask (work on other dishes) if you please

And it bears repeating… they’re freakin’ awesome.

INGREDIENTS:

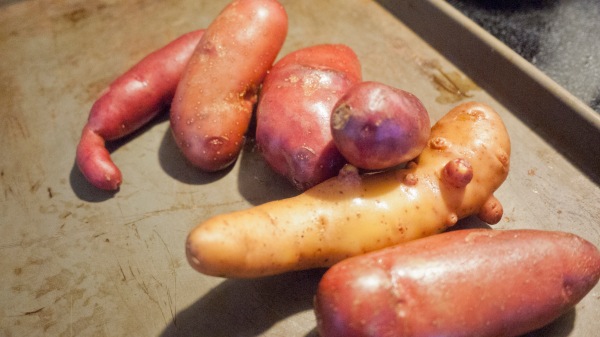
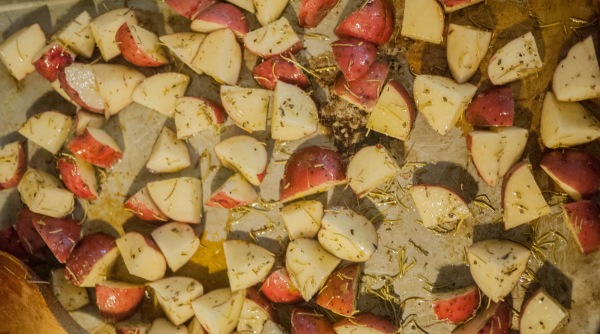
  • 6 small chopped hardy potatoes – think red, fingerling, yellow – NOT mashing kind (no russets!)
  • 3tbl+ Olive Oil
  • Dried herb of choice – 2tsp+
  • Salt & Pepper to Taste (my favorite part of the process, anyway!)

*NOTE: If you’re going to opt to use fresh herbs – which is an excellent choice! – I recommend reading the roasted carrot recipe here for measurements. It converts nicely to the roasted potatoes just fine.

DIRECTIONS:

Preheat your oven to 425*.

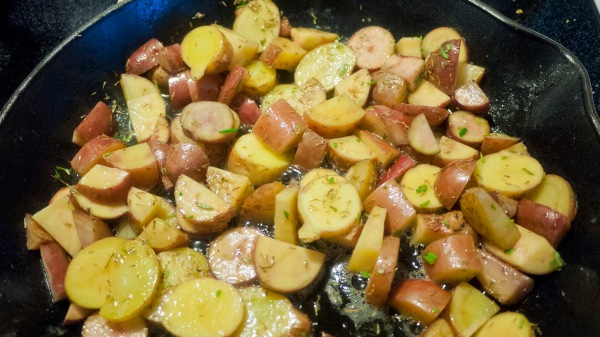
After your potatoes are washed and chopped, drizzle your 3 tablespoons of olive oil over your pan.

Dump your potatoes on the pan, and swirl, stir, etc… goal is to get them semi coated. If your potatoes aren’t all coated, add a little more oil.

A good dose of salt, pepper, and your herbs.  When you pull these out to test for doneness, you are also going to test for seasoning – hence the “2tsp+”.  Start with two teaspoons, and if you feel it needs more later, knock yourself out.  Our family’s favorite herb/spice for this is dried thyme. LOVE it.  Pictured here, though, I am using a combination of rosemary and thyme.

Stir/swirl again to coat all the potatoes with the spices/seasonings.

Lovely Roasted Potatoes

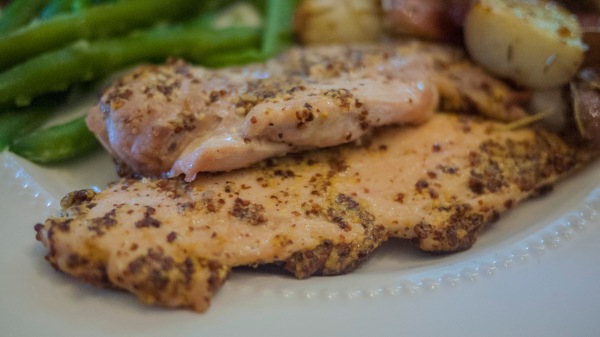
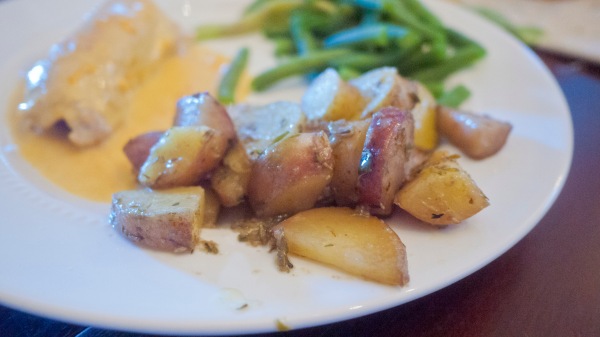
You’ll see here I’m baking them along with the Simple Mustard Chicken.  These two dishes go very well together!

Lovely Roasted Potatoes - Foodies Gone Real

Cook the potatoes for a total of 20 minutes, testing at about 15 minutes.  At the 15 minute mark, you’re going to use a spatula to turn/stir so the bottoms of the potatoes don’t over-brown. (Not that I mind the browning. Frankly, I love it.)  This is when you test the seasoning level.  If you bite into a potato and it’s crunchy… likely going to need more than another 5 minutes.  If it’s firm, or almost done, another five will help it evenly brown.

I don’t like to hold to specific times on recipes… it’s misleading for the following reasons:

  1. Gas and electric stoves heat differently
  2. Even different gas stoves heat differently
  3. The type of pan you’re using affects this. For example, a dark metal is likely going to brown it faster, stoneware (think pizza stone) might take longer, especially if not yet well-seasoned

So… you’re going to have to use a little bit of your best judgment here.

Lovely Roasted Potatoes - Foodies Gone Real

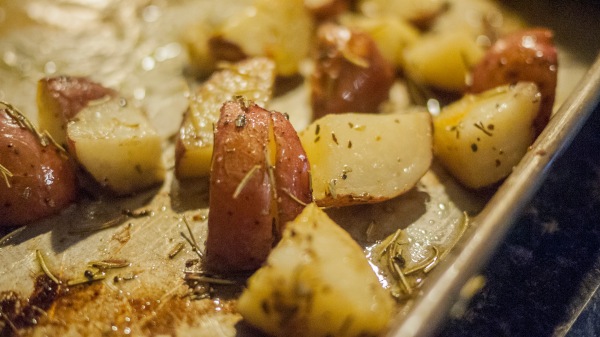
Once done… serve up, and serve up fast. Because, they’re worthy of it. But… just being real here… they taste just as awesome at room temperature. Or even cold. Yes… I’ve even eaten them cold out of a container from the fridge (on the rare occasions it’s not all eaten at dinner!).

Bon Appetit!

Lovely Roasted Potatoes - Foodies Gone Real


Simple Mustard Chicken

Sometimes, I just buy chicken breasts without a plan.

I’ve had to extend a BUNCH of grace to myself in the kitchen (read here). Unpredictable pain and the fatigue that settles in afterwards will do that. I am getting better on that front – read about that here – but it’s still something heavily managed.  Girlfriend’s gotta have major flexibility in what she’s planning.  (Haha… there’s a pun there… if you’re looking for it and you’re up-to-date on the health issues in the previous post!)

This means, many times, I cook up a storm in the kitchen. I’ll make a bunch of things at once to carry us over in the event my health issues or our schedules don’t align.  So, yeah. Buying chicken breasts without a plan.

This recipe is EASY for those nights without a plan. Aside from the fact it’s crazy easy to prepare, it never takes long to cook.

Confession: this is based on a recipe that once existed – where? I do not know.  I know I scoured my pinterest boards, googled, and everything… and I ended up making my own recipe for this over the last few years since I can’t seem to locate the original. So while I cannot take credit for the creative idea for this dish, I can for instructions, measurements and pictures – that is all my own.

INGREDIENTS:

4 cuts of boneless (here is 1 breast cut to tenderloin and 3 thighs)
1/2 c whole grain mustard (dijon will work ok, too)
salt & pepper

DIRECTIONS:

Preheat your oven to 425 degrees.

Grease your pan. If you use well-season stoneware, you won’t need much. Otherwise, do it well. Or grab some parchment paper. I usually drizzle, then use my hand to finish spreading. (Olive oil is a great moisturizer! And it now means other stuff won’t stick to my hands as I continue to work with the chicken.)

Simple Mustard Chicken - Foodies Gone Real

I found this awesome mustard at Aldi’s. Man, I love that store. You can find neat stuff there. (Read my ramble on good finds at Aldi’s, here.)

Simple Mustard Chicken - Foodies Gone Real

Use a spoon, spatula, and probably a finger or two to smear the mustard all over both sides of the cut of chicken.

Note about the cuts: I’ve never tried drumsticks, but I gotta imagine you’d have to lower the temperature and cook for much longer – bones do that, ya know.

Salt and pepper the chicken.

Simple Mustard Chicken - Foodies Gone Real

I wish it looked as good as it tasted.

Cook in oven at 425 degrees for a total of 15 minutes – I recommend flipping the cuts at about 10 minutes.

Simple Mustard Chicken - Foodies Gone Real

The mustard does something wonderful about keeping the moisture in, I love it. They also come out nice and golden.

I served this with roasted potatoes (recipe soon!) and green beans cooked with bacon. (You can do those green beans up with a easy step, here! Veggies never go wrong with bacon!)

Simple Mustard Chicken - Foodies Gone Real

All of these three items cook simultaneously in about the same time – aside from preheat, I don’t think I spend more than 15 minutes active cooking all of this and voila! Masterpiece!

Simple Mustard Chicken - Foodies Gone Real

Perfect… and simple.

Simple Mustard Chicken.

French Fingerling Potatoes

So, if you know me, or if you’ve followed the Foodies Gone Real facebook page for any length of time … you’ve bound to run into my obsession with things FRENCH.

I’m a massive Julia Child fan, my long-term decorating goals are French inspired… and yes, I love French food.  (I had the great opportunity of visiting several times!)

You may have also caught my copy-cat recipe for Chicken Cordon Bleu.  (But just to be clear… it may not be legitimately French, but an American attempt at French cooking.)  This is my official side dish.

P1180795

If you see me in my kitchen, you might see me in my favorite apron from Williams Sonoma (the MOST durable and thick apron, ever!)

P1180765

You can use another potato good for roasting… like a hardy purple potato or red-skinned potato. (Read up on the health benefits of the varieties in this post).  We get fingerling potatoes yearly in our CSA share (Community Shared Agriculture) and they are tougher than the conventional russet.  In other words… these are not the potatoes for mashed potatoes at Thanksgiving dinner.

You should know that fingerling potatoes are considered an heirloom – they are not bred for mass production, but for taste and preserving older kinds of potatoes.

P1180755

First up,  pick your six fingerling potatoes chop them into bite-sized pieces.  This really just helps with the cooking all the way through.

P1180768

Melt 2-3 tablespoons of butter in a heavy pan.

P1180762

While the butter is melting, chop your rosemary.  You can sub in other herbs… thyme, tarragon will work well, too.

P1180771

P1180774

Saute the potatoes and 1 tbl of fresh chopped rosemary in the pan, until the potatoes begin to turn golden.

P1180780

Add 2 cups of chicken broth.  Bring to a rapid boil.  Let them boil for no more than 5 minutes.  Cover, and let them simmer for about 20 minutes.

P1180784

The goal is for the potatoes to be fork tender.  The starch naturally in potatoes is going to thicken much of the broth into a super yummy sauce.  As in good enough for a spatula after dinner. ;-)

P1180782

Don’t mind my mismatch cast-iron.  You do what you gotta do.

After it’s thickened and potatoes are fork tender, salt the dish well.  I do not recommend a specific amount of salt as your broth will determine how much additional salt you might like. (And of course, saltiness is definitely a preference.)

P1180789

And viola! Bon Appetit!


Sarah’s Chicken Cordon Bleu

You ever just crave something that you know is crazy bad for you, but you just HAVE to scratch the itch?

Yeah, me too.

Terribly.

So I created this mainly because I like those cheap, breaded, pretty-bad-for-you chicken cordon bleu frozen dinners.  And, while I could go buy some and use it as a “cheat” meal, I’m pretty sure I would just continue this bad habit and have more cheat meals than is healthy.  (This is not for everyone… I just know myself well enough.  I usually save cheat meals for special occasions, going over to someone else’s house for dinner, going out to eat, traveling, etc.)

Your chicken breasts will look something like this:  Chicken Cordon Bleu - Foodies Gone Real

I knew I was doing this a little bit different than the conventional cordon bleu recipe … I was putting the cheese on the OUTSIDE instead of in the chicken breast.  So, in order to defend the “original” way of making this dish, I titled it with my own name, just so we understand the difference… however, as it turns out, it seems to be up for debate what chicken cordon bleu “originally” was!

The recipe appeared in U.S. newspapers in the 1960s, and there’s quite a bit of indication that it didn’t even originate in France, but America, as its attempt to mimic popular French dishes that incorporate stuffing one meat with another filling.  (Another great example of Americanizing food?  Look at many popular pizza or Italian restaurant choices, then go visit Italy.)  And, contrary to any sort of “word” connection, there is no origination of this recipe from something at the famous Cordon Bleu cooking schools in France (if you’re up on your food history/gastronomy).

So, as it turns out, I can pretty much make this dish WHATEVER I want because I’m not really dishonoring some great classic piece!

To get this dish started properly, you’ll need to read up on my instructions on stuffing a chicken breast.  You can find the instructions here.  If you have another (or better!) method for stuffing a chicken breast, knock yourself out.  You do not have to use my method of stuffing for this dish to work!

Last note… I recommend that one chicken breast serves two people.  The logic is two-fold:

A) You’re getting more meat in as it’s a LARGE breast, and you’re stuffing it with ham

B) Americans tend to over-do the meat thing.  One serving of meat is the size of your fist.  (Men need a little bit more than women, due to nutritional requirements.)  I don’t have the source for this information, just recalling it off the top of my head.  I did a quick google search on the topic, though, and you can find scores of sources saying the same thing. (Point B.1.: Quality meat is also incredibly expensive.  So we hold very true to one serving of meat per meal as to keep our grocery costs down.)

So needless to say, this is instructions for one breast, serving two people.

INGREDIENTS:

For the meat:

Large, plump chicken breasts

Precooked ham – one ounce per chicken breast is usually enough

Almond Meal/Sprouted Flour (either will work) – you’ll need about 1/4 cup for one breast

For the sauce:

1.5 cups of shredded cheese, I recommend super-sharp cheddar

1 cup milk

1/4 tsp. prepared spicy mustard

Sprinkle of pepper

Sprinkle of nutmeg

2 tsp Sprouted flour, rice flour, tapioca/arrowroot (you’re using it as a thickener)

1 tbl Butter (preferably grass-fed for optimal nutrition)

dash of parsley

TOOLS:

Sharp Knife

Toothpicks

Plastic Wrap

Dredging dish

Oven-safe dish for roasting breasts

Small pan for making sauce

whisk

DIRECTIONS:

Preheat the over to 425*.

Go over to this page and follow the instructions for how to cut and stuff.  You are going to stuff it with all that cooked ham (as pictured in the other post).

Chicken Cordon Bleu - Foodies Gone Real

You’re going to want to bread it – so now is when you’ll throw your almond meal or sprouted flour in your dish for dredging.  Very carefully roll the stuffed chicken breasts in your meal/flour.

Chicken Cordon Bleu - Foodies Gone Real

Once it’s thoroughly covered, move “breaded” stuffed breast to your tray for baking.

If you’re making more than one stuffed chicken breast, repeat the process.

Once all your chicken breasts are stuffed and breaded, cover your dish and place in the oven for 15 minutes at 425*.

While this is cooking, shred up your sharp cheddar cheese.

After the first “set” of 15 minutes, you’ll want to turn the breasts over, uncover, and put in the oven for another 15 minutes.

Now you can start working on your cheese sauce! (And let’s be real… this is what we’re really want!)

Warm your milk to almost boiling.  Once it’s almost boiling, turn the heat down as low as it will go.  Whisk your mustard, pepper, nutmeg, and sprouted flour/arrowroot/tapioca/rice flour.  Make sure there are no lumps!

Slowly stir in your shredded cheese.  Keep stirring.

Stir some more.  You’ll see that your ingredients are combining well (keep that heat on low!) and when you bring your spoon up, it’ll be like a really thick sauce, not too stringy.  If you notice it’s starting to become “stringy,” go ahead and turn the heat off.  Just remember to stir it every so often.

About this time, it’ll be time to take those chicken breasts out of the oven!

Your chicken breasts will look something like this:

Chicken Cordon Bleu - Foodies Gone Real

Stir your cheese sauce some more.

Carefully take the toothpicks out just as soon as you can bear touching the chicken.

Plate your chicken and smother those chickens with your cheese sauce. Top with a dash of dried parsley.

Your chicken breasts will look something like this:  Chicken Cordon Bleu - Foodies Gone Real

And now, you can go guzzle.  Enjoy that cheesy chicken cordon bleu!

Sources:

Cordon Bleu (dish), http://www.en.wikipedia.org

History of Chicken Cordon Bleu, http://www.ehow.com